Monday, March 29, 2010

Easter basket

I had an idea for an Easter favor and just had to take a break and try it out before I forgot. It's a little basket made with the Perfect Setting die. For the bottom, I simply put in a cupcake paper liner. Easy Peasy!

Big Shot:
Perfect Setting, Texture plates, Little Leaves sizzlit, 
Tip: save the little eyelet cutouts for the center of the flowers,
Colors:
Lovely Lilac, Old Olvie, Cameo Coral, Summer Sun
Bunny:
Whisper White, Chocolat Chip ink, Creamy Carmel marker


All that's left is to go buy some goodies to fill it up with. 
What do you think?

Wednesday, March 24, 2010

Easter Cards


I taught another class on Tues. afternoon (March 23rd) at "A Place to Belong". They were soooooo excited about their creations. They asked the coordinators if I could come back again so they could make Mother's Day and Father's Day cards. I'm booked for May 4th and I am planning to have alternate verses incase Mother's and Father cards are unneeded. You all know that I'm "easy challenged".  Therefore if you see some easy guy cards, I NEED to see them.

A Place to Belong is a social setting for people go to that are having mental difficulties. When demos coined the saying that Stamping is rubber therapy, I don't think this is what they had in mind, but it's right on the mark! Seeing their faces as they look with pride at their cards is priceless. The coordinator said they really look forward to me coming and it's all they talk about for days afterwards. Even though these classes result in no sales, the feeling that I've really made a difference in someone's day is so amazing and fulfilling. And that's therapy for me!


Bunny card details:
7 minutes, 35 seconds is all it took me to make my display card!!! Yeah!! I'm pretty proud of myself about that! When you say chocolate bunnies and baby chicks, it reminds everyone of Easter!
Supplies:
Crushed curry; paper & ink, Chocolate Chip ink, Gold brad, blender pen. The inside is stamped with God's Blessings in chocolate chip ink: Sharing with you the miracle of new hope and new life through the glorious gift of Christ the Lord. They also stamped the little chick and broken egg shell next to the verse. Obviously the yellow envelope is not SU, it's from my before SU stash because I only had enough white ones to give them 1 each. 
Stamping Tips: 
--- Stamp the bunny in the corner  on the whisper white layer before doing the embossing. --- Stamp the inside verse before assembling the card & if you muck it up refold the card so it becomes your front. You can cover up the mucking with your embossed whisper white bunny layer.


Supplies:
Pretty in Pink paper, retired stamp set: 1998 Easter Blessings, retired Raspberry Tart DSP 3"x4",  Mellon Mambo ink, the little flower is from Eastern Blooms, Crystal clear brad. The inside is stamped with God's Blessings in mellon mambo: Blessings brighten when we count them! THANK YOU for blessing my life in such a wonderful way!  White SU envelope. One of the things I so appreciate about doing these classes with "A Place to Belong" is they have provided me with an opportunity and have encouraged me to use retired products. 

To make the flowers: I had them put the punched pieces in the palm of their hand and then rub the petals with the bone folder to add curves. One of the members was worried about the wrinkles in the paper, and I said it made them look like the veins in real flowers. The edges of the flowers are sponged and then attached with dimensionals. My original sample didn't have sponging on the edge of the card, but a couple ladies asked if they could sponge the edges like last time. Then others asked what that meant, so I used my card to show them how it would look. Before long everyone had sponging all over - on every edge you can think of, even the envelopes and the flaps. 


I'm showing two different variations of the same card because one lady had trouble stamping on the inside of the card and smudged the verse. Tip: Stamp your inside verse before embossing the front of the card. This horizontal version of the card has the DSP in the middle to cover up the previously stamped and smudged image. I did this card to show them that there's no mistakes, just revisions in the layout. I think I may even like this one better. If I would have put the saying in the opposite corner it would have looked great vertically also.


Another tip: Never leave home without extra supplies for a couple additional cards.


Inspiration for my cards came from Lisa Reber and Debbie Currier cards on Stampin' Connection. It's an awesome website only for Stamping Up! demonstrators. I'd love to help you sign up to be a demonstrator so you can access to  all the wonderful ideas, examples, and discussions.

Friday, March 19, 2010

Storage idea for alphabet letters

Here's something I shared at a SU meeting earlier this week. The "disposable" society we live in will tell you this idea isn't practical because you could almost cut a whole pack of paper for what it costs to buy this little container. I have no excuse for my defense. By the time you pop out all the letters and sort them into their spaces, I'm not sure it even saves time. 

BUT I don't have to be logical! I am Woman! 
No more explanation should be necessary!   ; )

It bothered me to toss all those extra letters. On more than one occasion I've dug through my recycle pile looking for just a couple letters muttering: Why did I throw away all those extra letters? Here's my solution.

Do you recognize what container this is? 


It's a 4 times daily pill dispenser. I punched circles out sticker paper to cover the Morning, Noon, Evening, and Bedtime words and then glued the letter on top. Pretty creative huh? There's days I just amaze myself (snicker, snicker).

This works great. The letters don't slide under or over the dividers like in other containers I tried. The bottom for each space is rounded so the letters don't get stuck in corners and are easy to pull out. Each letter has it's own cover and I don't have to worry about my kitten making a big mess when she tries to help me. . . Oh one more thing even though it's plastic it makes me feel like I'm being "green" because it's a reduce, reuse, recycle thing - and saving trees. 

Speaking of saving - once you sort out all the letters, you still have a lot of paper with letters left. The negative images still need to be rescued. An example of what I mean is the "r" found on my son's birthday card. 


How cool is that?
What can I say? I just have to spice things up sometimes.

Monday, March 15, 2010

What's happened to my brain?
Card challenge SCCSC7

My daughter asked me to bring my Big Shot and scalloped square when I was going to visit her. She wanted to make one of those famous Big Shot rag bags. In the meantime during packing, I forgot to grab my sister's birthday card. So once I got to my daughter's house I found myself in need of making the card and was challenged to use only the supplies my daughter had on hand plus my Big Shot with only the scallop square die.


Thankfully Diane Noble had emailed the Stampin' Connection's card sketch challenge SCCSC7 to our SU Diva group (Thanks Diane, it makes it so much easier to find). With the sketch to help with the layout inspiration, my next challenge was to decide on colors. Boy I never realized how much I used my color wheel to help me decide which colors to use together.


Here's my masterpiece! (big grin)
I just love how the new scalloped punch fits inside the Big Shot's scalloped square die.


So what do you think of my limited resources card? Okay it's not so limited, but without my craft room at my fingertips it sure felt that way   ; )

Here's a couple pictures of my daughter and her helper cutting out her butterfly purse:


Notice the butterflies!


I had taken some pictures of the other pieces, but they were blurry. Hopefully over Easter we can get it sewn together for her and I can post the finished purse then.

Monday, March 8, 2010

In the Dog House

Got-ta love Sale-a-bration FREE stamps!

I'm behind on making special cards. My up-upline was pretty ill and I wanted  something special to send her. I was waiting for my "Wellness Wishes" set to come and had planned to use the "Praying for you during your illness" stamp from that set. But this 3-D card is what I ended up with, hope she liked it. Better late than never, right?


Doesn't the SAB paper make for an adorable back drop?

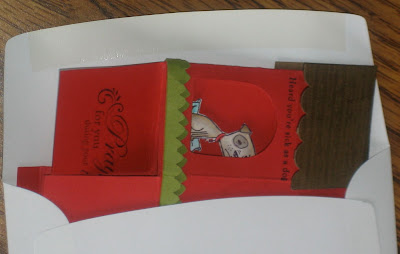
I left the one side of the top un-sticky-taped so I could send it in the mail. I cut off the front flap and folded it in half, then attached it to the back flap. That way it could be assembled like a box without needing to be taped on the bottom. Here's what it looks like going into the envelope. A perfect fit with some room to spare.


This time I actually made two so I could have one for my own display, but her sister ended up having a terrible week and needed to have a tooth pulled because of an infection. I decided she needed a pick me up card, so here it goes off to the mailbox. It's a good thing I never sticky taped mine together.